I've been trying to put this blog together, for about a week now, and it's not easy with very busy schedule at present. So, apologies for the delay.
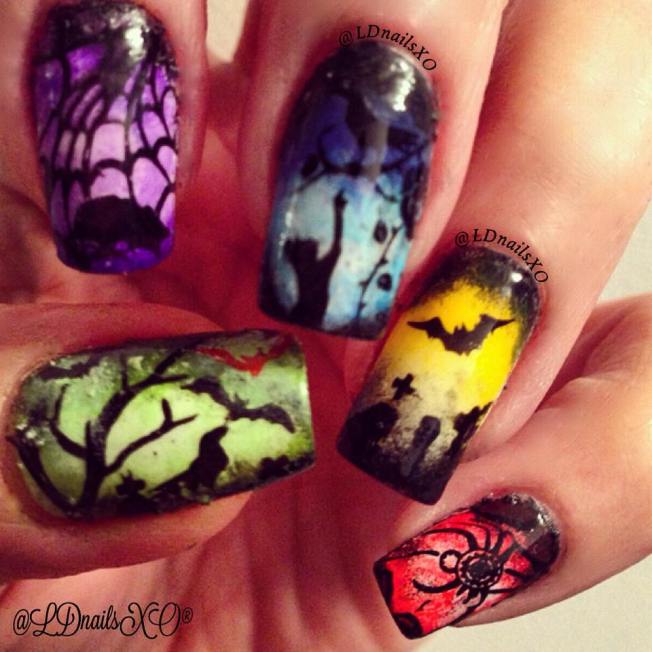
Spooky Nail Designs
 Let me go through with these design and products used one nail at a time. All nails are applied first with Alpine Snow by OPI as a base colour. And please note: - Let each coat of varnish dry before each application.
Thumb Nail - First let the white base dry. Then start the gradient by sponging Vices Versa (from the Neon 2014 collection range.) (Get it here.) by essie all over the nail, then randomly sponge the Screen Green (7-Yahoo) by Color Club - concentrating on the top and bottom side of the nail. Afterwards sponge Bridal Veil by A-England (Get it here.) at the top, close to the cuticle. Sponge lightly as you're going down away from the cuticle. Top coat it with Seche Vite. Let it dry, and stamp it with Mother Nature - 07 (Get it here.) for the tree trunks. Gothic - 07 for the bats and black bird. And for the crosses underneath the tree, I used Artist - 11 (Get it here.). All plates are by Moyou-London. Using Camelot by A-England (Get it here.) nail varnish for stamping. Then seal it again with Seche Vite.
Index Finger Nail - Now that we stablished the base colour. Let me begin with the first colour of the gradient. Sponge all over randomly the Sittin' Pretty (Get it here.) which again is part of the Neon 2014 collection by essie. Followed by Yahoo Purple (7-Yahoo) by Color Club - concentrating at the top and tip of the nail. Repeat procedure with the thumb for Bridal Veil by A-England, then top coat it with Seche Vite. Dry and stamp with Gothic - 07 by Moyou-London, using the web pattern and the black rat at the tip of the nail. Finished with another coat of Seche Vite.
Middle Finger Nail - I used I'm Addicted (Get it here.) and Chills And Thrills (Get it here.) for the gradient - both nail varnish are from the Neon 2014 collection by essie. Follow the same procedure as above for creating the spooky gradient, then stamp with Gothic - 07 plate by Moyou-London - using the pattern of the cat riching for the black bird. Now, you can do this in two ways. You can just stamp it straight onto your nail or create a decal, by applying a clear nail varnish all over the pattern on the stamper (Get it here.). Refer to my YouTube tutorials on how to create nail decal here. And as always finish with Seche Vite.
Ring Finger Nail - Nail varnishes for gradient are Psychedelic Scene by Color Club, Buttercup by Revlon and Bridal Veil (here.) by A-England. Stamped with Gothic - 07 (Get it here.) by Moyou-London, using Camelot by A-England nail varnish for stamping. The design at the bottom part of the nail was hand painted with Camelot by A-England. And for the crosses, I used Artist - 11 plate (Get it here.) by Moyou-London. Finished off with Seche Vite. Watch my video tutorial below.
Little Finger Nail - I only used two colours for this nail to do the gradient. Tech Red (7-Yahoo) by Color Club and Bridal Veil by A-England. Gothic - 07 plate for the spider by Moyou-London. And Camelot by A-England nail varnish for stamping. Procedures are the same as the other nails above. Except I left a bit of the base colour showing on the middle area of the nail, before stamping it with the spider, using Camelot by A-England nail varnish for stamping. Finished with Seche Vite.
No comments:
Post a Comment